Bots are contributing heavily towards the over internet traffic. Such traffic holds zero value, from a revenue or result point of view. However, it increases the vulnerability of a website/system to cyber-attack. Bot traffic might carry an attack vector and put the involved resources at risk.
To avoid those hassles, the use of bot protection is commonly seen. Businesses ranging from start-ups to enterprises are using bot protection tools like Cloudflare. If you’re not one of those businesses/individuals looking for bot protection but rather need to know how to bypass it, you’ve come to the right place.
As the post proceeds, you will be able to learn:
- What is Cloudflare bot protection and how does it work
- How to bypass it
- Steps involved in the process
It’s going to be a lengthy yet insightful read. So, gear yourself up.
Cloudflare Bot Protection – What It Is All About
Let’s start with knowing Cloudflare a little. Offered by one of the most famous web security companies, Cloudflare Bot Protection or Management is a feature of Cloudflare’s Security Operations Center (SOC)-as-a-Service.
The solution works well in all kinds of enterprises and aims to proffer facilities like end-to-end security monitoring, incident response, and threat detection.
The Bot Management module is designed to control the bots that penetrate beyond the CAPTCHA and are responsible for headaches like credit card stuffing, credential stuffing, inventory hoarding, application DDoS, content spam, and so on.
As not all sorts of bots are worrisome, the tool permits certain bots to operate despite the deployment. Google, chatbot, personal assistance bots, and crawling bots are the name of a few permissible bots by Cloudflare.
While the usage of this bot management feature works well for cyber-security enthusiasts, this is a major hurdle for professionals/organizations interested in conducting large-scale web scraping as the feature will not make the bot work.
Every webpage, backed by the bot protection of Cloudflare, is going to deny access to the bot. Even with frequent attempts, you end up with error messages like Error 1012: Denied access or Error 1015: You’re being rate limited again & again.
If this is what you’re struggling with presently, you need to learn about the best bot protection mitigation practices. This is only possible when you’re aware of the processes that Cloudflare uses to identify bots as this understanding will help you for quick and smooth bypassing.
Bot Detection with Cloudflare
Bots of all sorts exist and Cloudflare, based upon the workflow of the bots, adopts assorted bot detection techniques. They are categorized into two sections: active and passive bot detection. Below, we have explained both these techniques with adequate examples.
Passive Bot Detection Methodologies
The passive technique is based on performing extensive fingerprinting checks at the backend. Some of the examples of this technique are quoted below.
- Botnets detection
Using the high-end behavioral analysis, Cloudflare monitors the botnets‘ processing and maintains a record of IP addresses and devices that account for malicious bot behavior. Whenever a request is received from that device/IP address, it’s automatically blocked.
- Monitoring the IP’s fraud score
Each IP address has a fraud or risk score that indicates the reputation of the said IP address.
The deciding factors here are the ISP’s reputation history, geolocation of the IP address, and source of IP address. Cloudflare checks the fraud score and limits the bots’ feature poor ratings.
- Checking the HTTP request headers
The HTTP request header of a request tells a lot about its authenticity. Cloudflare assesses the HTTP request header of the request to find out whether it’s coming from a bot.
Any request, coming from a non-browser agent, will be identified as a bot and will be blocked immediately. Any request with missing or mismatched headers is also considered a bot-generated request and will be blocked.
- Use of TLS fingerprinting
One of the most technology-extensive approaches, TLS fingerprinting allows Cloudflare to trace the request resource/client. JA3, CYU, and JARM are some of the most commonly used TLS fingerprinting methodologies used here.
It’s a viable approach for bot detection as TLS implementation varies in case. It won’t be the same for two TLS versions, request libraries, and browsers. The TLS fingerprints of a Firebox browser in Windows 8 will not be similar to the same browser in Windows 10. Each one accounts for unique TLS fingerprinting that takes place at the time of TLS handshake.
When it happens, Cloudflare checks the information mentioned in the ‘client hello’ message. Generally, details about elliptic curves, cipher suits, and extensions are mentioned in that. Cloudflare assesses this data and constructs the fingerprint hash.
When the hash is successfully created, Cloudflare look-up for it in pre-built TLS fingerprint data to verify its authenticity. It will try to match for the newly-created client-side hash and when that’s spotted, Cloudflare continues comparing the client-side user-agent header with the user-agent of the pre-stored fingerprint hash.
If that’s also a match, Cloudflare confirms that the request is coming from a legitimate source and permits it. A mismatch leads to request blocking immediately.
- HTTP/2 fingerprinting technique
Just like TLS, the HTTP/2 header is quite useful for bot detection. Supported by all the leading browsers, HTTP/2 accounts for improved web application and website security. Every HTTP/2-based request features unique header field compression that is used for permitting simultaneous requests received over a TCP connection.
With the help of the binary framing layer, HTTP/2 fingerprint is possible which entails using frames, pseudo-header fields order, and stream priority information. HTTP/2 is unique for every client request and Cloudflare uses this uniqueness to verify the request’s authenticity.
Just like TLS fingerprinting, the HTTP/2 fingerprinting of users and agents are matched with entries of pre-built whitelisted entries.
The request is move forward only when the match is found, just it happens in TLS fingerprinting. That was the end of the passive bot detection processes that Cloudflare adopts. Out of all, TLS and HTTP/2 fingerprinting are the most preferred ones. Cloudflare adopts them in most cases because they are mostly accurate. Hence, if your goal is to bypass Cloudflare bot protection, you need to get your hands on these two techniques.
Active Bot Protection Methodologies
Active bot detection involves client-side checks to find out the presence of the robot and stop its penetration. We present you with some of the most preferred and non-exhaustive active bot detection processes that Cloudflare adopts.
- CAPTCHA usage
For a very long time, CAPTCHAs have been used for early-state bot detection. It’s easy to implement, hardly causes any harm to the user experience, and works well with most browsers. CAPTCHA, when placed just before the website login process, helps a website server to ensure only human access to the website.
It exists in multiple varieties like a combination of digits and alphabets, image-based text, audio-based tests, and so on. CAPTCHA is based on the fact that certain patterns and images are only interpreted by human intelligence that a bot can never own.
Cloudflare also uses this test process to confirm the presence of bots. However, not every time is used as a solution. CAPTCHA usage depends on multiple factors like the site configuration, presence of suspicious traffic, and use of non-standard browsers.
Earlier, reCAPTCHA the service provider was assisting Cloudflare in its bot detection process. Presently, it has shifted to hCAPTCHA.
- Canvas fingerprinting
Up next, we have canvas fingerprinting as the active bot detection process that Cloudflare adopts. The methodology involves enabling the device class identification ability in a system. Now, what device class is it? It’s nothing but the combined information about the graphics hardware, OS, and browser that the concerned system is using to access a website/webpage.
Most JavaScript-based web pages use Canvas, an HTML API-based API, for animation and graphics designing. Its fingerprinting is possible by instructing a webpage to fetch the API details in the form of an image. The obtained image is hashed further and the fingerprint is finally generated.
The involved computing system layers here are hardware, low-level software, high-level software, and high-level software. All these layers will have different values for different device classes. Hence, it’s possible to derive a distinguished canvas fingerprinting.
What’s worth noting here is that, alone, canvas fingerprinting isn’t preferred to identify the bot. The best it can do is to provide accurate information about device classes.
But, it does hold certain worth in bot detection as bots are more likely to provide fake device class details and canvas fingerprinting can help one to identify the sources that are providing fake device class data.
Clearly, a mismatched device class is an indication of bot presence. Presently, the Google-owned canvas fingerprinting technique, Picasso Fingerprinting, is what Cloudflare is using.
- Event tracking
With the help of a wide range of event listeners, Cloudflare tries to find out the key user actions that are happening on one webpage/website.
The actions monitored here are keys used, the number of mouse clicks done, and mouse movements. A human internet user will have natural use of a mouse and keyboard to access websites/webpages.
For instance, a human internet user will need the mouse to click on a link, use the keyboard to type search results, and will make frequent mouse clicks during an internet usage period.
On the other hand, when the bot is accessing a webpage, many mechanized actions will take place. Automatic commands, multiple requests without much keyboard usage, and nearly zero mouse clicks are some of the suspicious activities that only bots make. Hence, event tracking makes bot detection possible.
- Environment API querying
Lastly, we have an environment API querying technique that is very elaborate because it involves using Web APIs for bot detection, which is many in number.
The four key categories of those bot-identifying Web APIs are:
- Timestamped APIs
APIs having mention of time or date fall under this category. For instance, window.performance.timing.navigation start or Date.now(). Cloudflare uses such timestamped web APIs to identify bots.
Any API having suspicious timestamps will be blocked immediately as such APIs are often associated with bots.
- Browser-specific APIs
Every browser tends to have distinct specifications like the one Chrome browser has a window.chrome property. None of the other standardized browsers has it. Cloudflare uses this browser-specific information for bot detection.
If it finds out that a request isn’t forwarded from a browser that the browser-specific APIs indicate, the request won’t be processed further.
- Sandboxing Detection
Sandboxing is the term used for the attempt of introducing a browser in a non-compatible ecosystem. This attempt points out the presence of a bot and Cloudflare takes the help of multiple checks. While performing the checks, emulated browsers like JSDOM and NodeJS are used.
- Automated browser detection
This bot detection approach involves inquiring about properties that only fully automated browser ecosystems feature. Some of those properties are windows.callPhantom and window.document._selenium_unwrapped . Both these properties indicate towards the presence of PhantomJS and Selenium respectively. If these properties are spotted then your request will not be forwarded.
That was too much information, right? Well, the essence of it is that Cloudflare, just like any other antibot resource, collects sensor data with the help of the above-said methods. After collection, the sensor side data’s inconsistency on the server side is observed closely.
Now, the next step that Cloudflare adopts is using its waiting room where these methods are actually used. If you’re looking for a 100% viable bot bypass method then you must learn to deal with this Waiting Room as well. In the next section, we will explain what a waiting room is and how to deal with it.
Cloudflare Waiting Room – A Major Hurdle for Users
Every time an internet user tries to access a Cloudflare protected, s/he will spend some seconds in its Waiting Room where the at-work browser has to spend a few moments to solve the Cloudflare-thrown challenges that are required to confirm whether you’re a bot or not.
While you’re in the waiting room, you might get to see messages like:
Check your browser settings before re-accessing test.com
Or
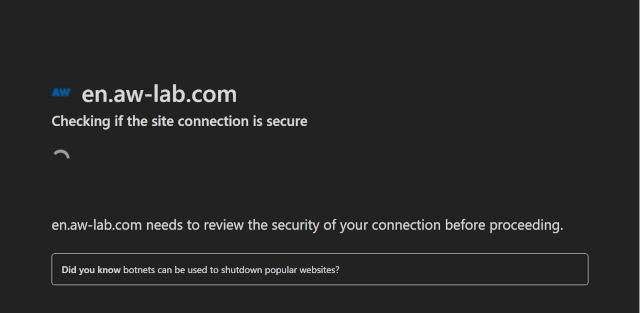
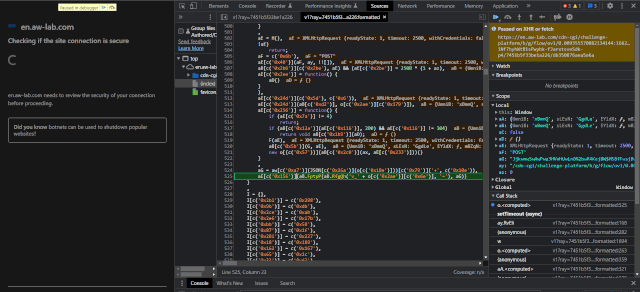
en.tw-lab.com needs to review the security of your connection before processing.
It looks like this in real life:
The other names for waiting rooms are – ‘Cloudflare JavaScript (JS) Challenge’ and ‘Cloudflare I Am Under Attack’. Anyone seeking complete bot bypassing has to learn ways to bypass this page as well because the detected bot will lead to access-request’s rejection and your request will not be moved beyond the waiting room.
Next, our focus is on explaining the JavaScript challenge and the method to reverse-engineer it that demands more technical expertise.
Reverse Engineering Technique For Cloudflare JS Challenge
Step #1 – Start with Looking into the network log data
Note: To explain the steps, let’s say you’re trying to access an imaginary website, AW Lab.
The first task to complete successfully here is to find out the network log details. For this, go to your standard browser tab and open the Developer Tool section. Expand it to find out about Network Lab. Leave this section open and now try to visit the targeted website, AW Test.
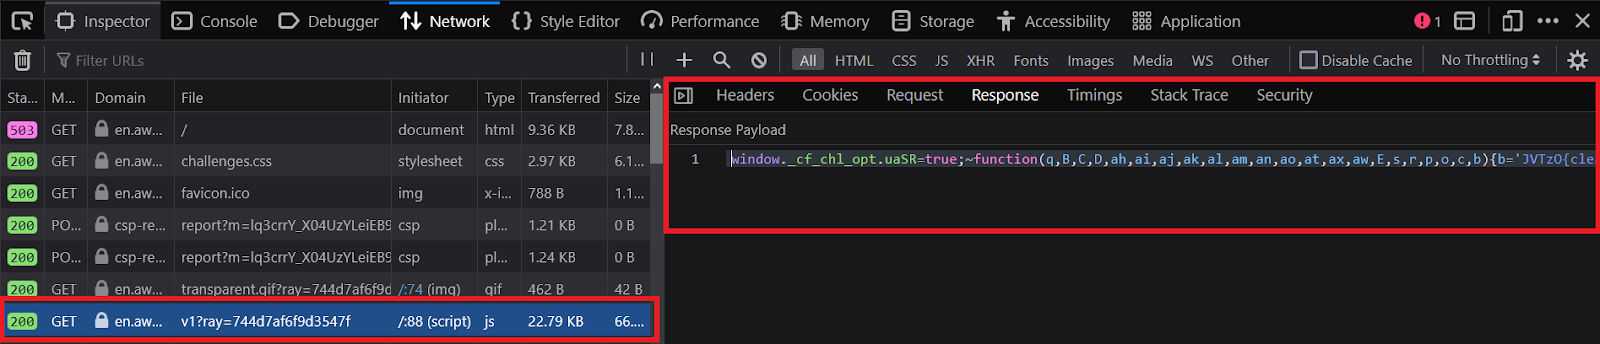
Once the access request reaches the actual site, you will get to see a list of important requests.
The first request would be GET to fetch the https://en.aw-lab.com/. It will feature the response body in the form of an HTML of the waiting room.
Additionally, the response body will feature <script> tags to explain the key functions that initiate the primary level process and will present the ‘initial challenge’.
It will look like this in real-life.
(function () {
	window._cf_chl_opt = {
		cvId: '2',
		cType: 'non-interactive',
		cNounce: '12107',
		cRay: '744da33dfa643ff2',
		cHash: 'c9f67a0e7ada3f3',
		/* ... */
	};
	var trkjs = document.createElement('img');
	/* ... */
	var cpo = document.createElement('script');
	cpo.src = '/cdn-cgi/challenge-platform/h/g/orchestrate/jsch/v1?ray=744da33dfa643ff2';
	window._cf_chl_opt.cOgUHash = /* ... */
	window._cf_chl_opt.cOgUQuery = /* ... */
	if (window.history && window.history.replaceState) {
		/* ... */
	}
	document.getElementsByTagName('head')[0].appendChild(cpo);
})();
Take note of the fact that this script tends to vary from browser to browser as it rotates for every new request.
- Here is what a GET for ‘initial challenge’ script will look like.
https://en.aw-lab.com/cdn-cgi/challenge-platform/h/g/orchestrate/jsch/v1?ray=<rayID>In the above example, <rayId> represents the window._cf_chl_opt.cRay value that comes back as an obfuscated JavaScript script, which rotates with every new request.
Up next, you need to use a POST request that will look like:
https://en.aw-lab.com/cdn-cgi/challenge-platform/h/g/flow/ov1/<parsedStringFromJS>/<rayID>/<cHashIn the request, the string, <parsedStringFromJS>, is mentioned in the initial challenge script while the <cHash> denotes the window._cf_chl_opt.cHash value. As far as the request body is concerned, it’s the URL-based payload in the v_<rayID>=<initialChallengeSolution> format. Speaking of the response body of the related request, it’s basically a lengthy base64-encoded string.
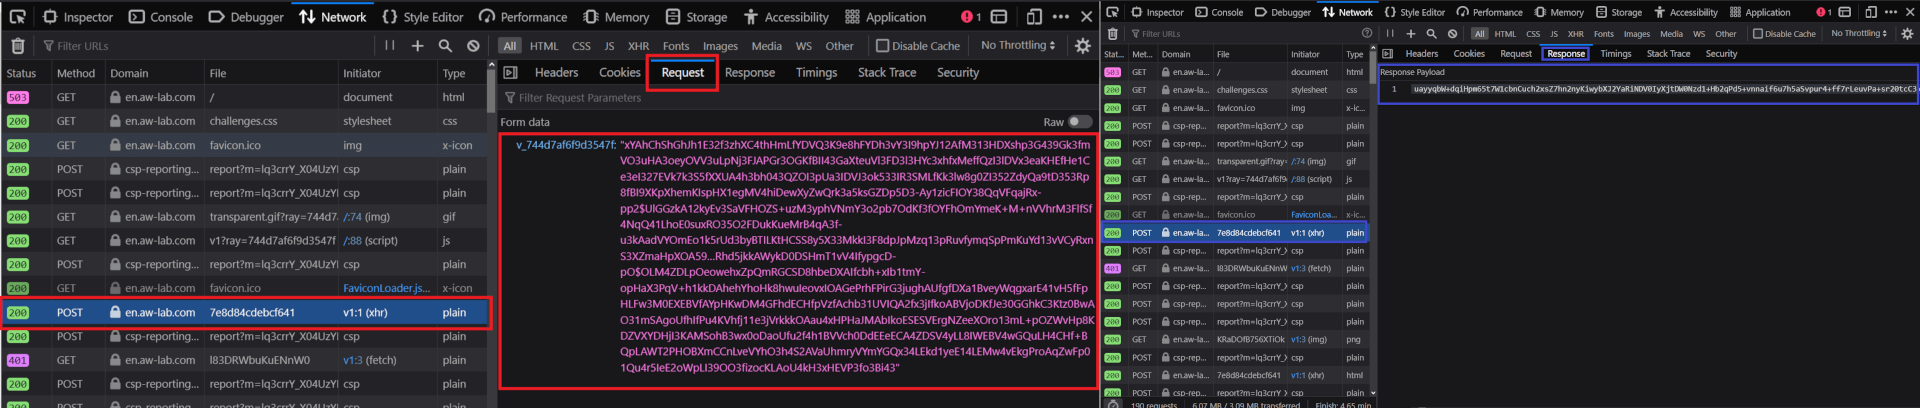
Next, you need to send second POST request to
https://en.aw-lab.com/cdn-cgi/challenge-platform/h/g/flow/ov1/<parsedStringFromJS>/<rayID>/<cHash>In the second request also, the payload is based on the format as the same as the first POST request and the response is based on a base64-encoded string. The job of the second POST request here is to forward the second Cloudflare challenge solution.

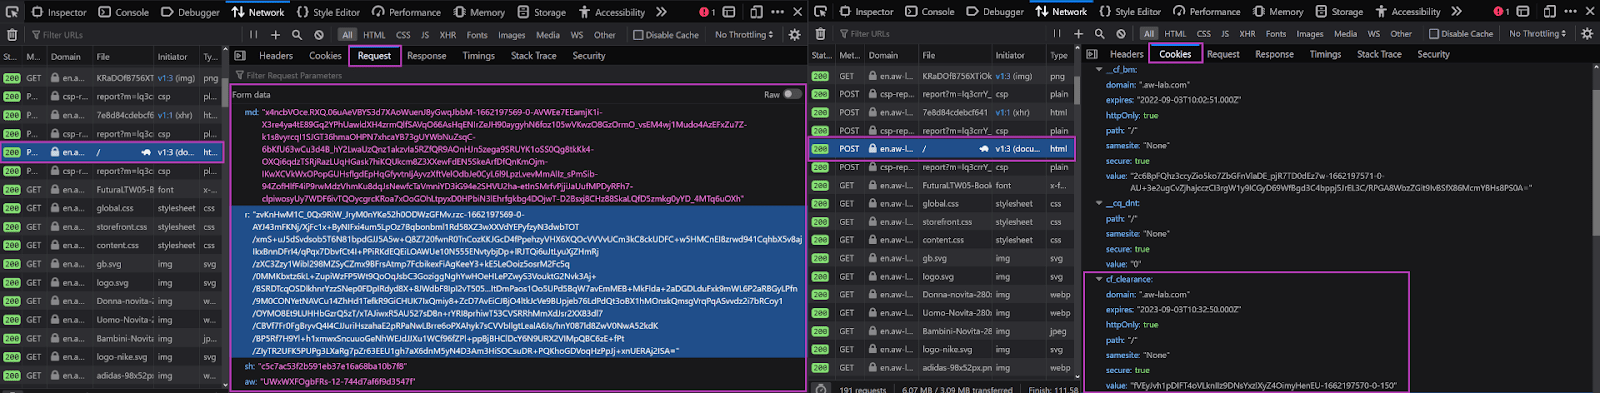
Finally, another POST request to https://en.aw-lab.com/ will be forwarded. This last POST request will feature some crypto-based data in the below-mentioned format.
md: <string>

r: <string>

sh: <string>

aw: <string>
The received output from this request will provide details of the original HTML of the targeted webpage. Along with HTML, you also get the cf_clearance cookie enabling you to enjoy free access to the targeted website. You don’t have to deal with further JavaScript challenges.
From the above request flow, extracting too much information isn’t possible as most of the data is encryption. If not encrypted, it’s in the form of arbitrary text streams that are also not readily available for making sense. This is what causes the need of learning the black-box reverse engineering technique.
Step #2 – Bypassing the Cloudflare JavaScript challenge script
The biggest challenge that you’ll face while bypassing Cloudflare is debugging the JavaScript challenge as highly obfuscated scripts are used. At the time of writing, there was no known and official anti-debugging protection at the place. Hence, we find it an achievable job to debug the JavaScript challenge script. Let’s get familiar with the steps involved.
- Go to the Developer Tools section in your browser. Activate an XHR/fetch breakpoint for all the incoming requests.
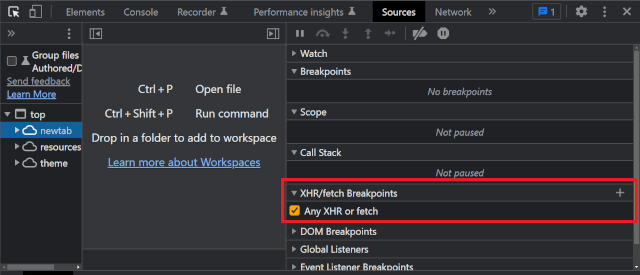
While you’re doing so, you need to be double sure that no cookies are saved. If cookies are, you will end up in the waiting room once again. Without closing the developer tools, go to AW LAB.
Now, you will clearly observe that the XHR breakpoint gets triggered before the POST request is made. The trigging is so quick that it takes place soon after the activation of the “initial challenge” script.
This will make every required function and variable of the given scope accessible. As the codes are not in a human-readable format, extracting much valuable information isn’t possible.
Upon careful observation, one can easily figure out that a single function is used a couple of times. In the above example, the overcalled function is the c function. For each recall, this function features a unified string-based hex number. When you run this function in DevTools, this happens.

From the output, it’s clear that a string-concealing obfuscation process is in place in Cloudflare. You need to simply do this and the job is achievable by running the functions and swapping the calls with the return values. The below section will look like this.
// The simplified code

(aG = aw["Cowze"](JSON["stringify"](o["_cf_chl_ctx"]))["replace"]("+", "%2b")),

aE["send"](aB.FptpP(aB.RfgQh("v_" + o["_cf_chl_opt"]["cRay"], "="), aG));
With the help of some techniques i.e. running codes in the console, we can infer that window and XMLHttpRequest instances are represented by o and aE variables.
Additionally, the technique works great for easy bracket notation to dot notation and then finally to yield notation conversation.
// The above code, even more simplified!

(aG = aw.Cowze(JSON.stringify(window._cf_chl_ctx)).replace("+", "%2b")),

// aE = new XMLHttpRequest(), an XMLHttpRequest instance initialized earlier in the script

aE.send(aB.FptpP(aB.RfgQh("v_" + window._cf_chl_opt.cRay, "="), aG));
Even the readability factor of the code is still not great, it’s manageable now and the readability can be improved greatly by simplifying all the string-concealing function calls.
Considering doing the job manually? Get ready to invest huge efforts. An automatic way to get things done is explained later in the post.
As of now, let’s focus on the next step to take. To send the first-ever POST request, just use the “continue until next breakpoint” button in the debugger. Soon after receiving the response, the next breakpoint will be paused automatically.
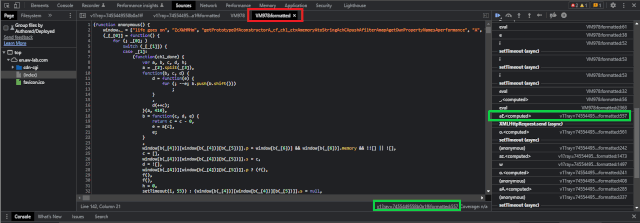
As you see, the debugger is now stopped at an entirely different script that we know as the second or main JavaScript challenge of Cloudflare. The careful observation of the network log helps us deduce that no GET request is present against this particular script.
As we didn’t introduce a GET request, from here did it come? Well, it’s not magic. Pay attention to the script and you’ll be able to spot an unnamed function, VM279 in the above example. This is the second script and is likely to be evaluated closely within the primary challenge script with the help of eval or something similar function.
Its presence is confirmed as we could see the ‘initial challenge’ script as the initiator in the call stack. Further clicking on the initiator will help you find out the exact script location where this ‘initial challenge’ script is processed.

Using the same method, the c function calls evaluation for string concealing undoing, and o with a window replacement is possible. If you proceed with this, the below-mentioned result is displayed.
// The line of code that initiates the second JavaScript challenge

// Note: aE = new XMLHttpRequest(), an XMLHttpRequest instance initialized earlier in the script

new window.Function(aB.pgNsC(ax, aE.responseText))();
The function inspection infers that the related function is generating a new function as per the responseText of the XMLHttpRequest value.
Things so far seem manageable. But, they are not great as most of the Cloudflare scripts are still no-readable for humans. Further manual debugging is of no great help, as it’s not permitted beyond this level.
However, with this vagueness, successful Cloudflare bypassing isn’t possible. You need to deobfuscate the JavaScript challenge for better clarity.
Step #3 – Further deobfuscation of Cloudflare JavaScript challenge script
As Cloudflare is using excessive obfuscation methods in the code, covering all of them is not possible. Hence, we’re going to present a crisp list of key methods:
- String Concealing
Cloudflare eliminates the string literals linked with references. In the above example, the c function works like a string concealer.
- Control Flow Flattening
This obfuscation technique involves obscuring the program control flow by mimicking the JUMP instruction. This happens with the effective use of switch statement dispatcher an infinite loop. This Cloudflare script looks like this in real life.
// An example of control flow flattening from the Cloudflare script.

function Y(ay, aD, aC, aB, aA, az) {

// The aB array holds a list of all the instructions.

aB = "1|6|11|0|15|9|3|10"["split"]("|");

// This is the infinite loop

for (aC = 0; true; ) {

// The below switch statement is the "dispatcher"

// The value of the aB[aC] acts as an instruction pointer, determining which switch case to execute.

// After each switch statement finishes executing, the instruction pointer is incremented by one to retrieve the next instruction.

switch (aB[aC++]) {

case "0":

/* ... */

continue;

case "1":

/* ... */

continue;

case "3":

/* ... */

continue;

case "6":

/* ... */

continue;

case "9":

/* ... */

continue;

case "10":

// Exit the function. This is the final switch case

return aD;

case "11":

/* ... */

continue;

case "15":

/* ... */

continue;

}

break;

}

}- Proxy Functions
Up next we have proxy functions as viable obfuscation techniques that work with Cloudflare. In this, function calls take the place of all the key binary operations like +,-,- or / are effective. By doing this, code readability decreases. It forces you to search for a clear definition of surplus functions repeatedly.
// An example of proxy function usage

az = {};

// '+' operation proxy function

az.pNrrD = function (aB, aC) {

return aB + aC;

};

// '-' operation proxy function

az.aZawd = function (aB, aC) {

return aB - aC;

};

// '===' operation proxy function

az.fhjsC = function (aB, aC) {

return aB === aC;

};

/* ... */

// Equivalent to ((1 + 3) - 4) === 0

az.fhjsC(az.aZawd(az.pNrrD(1, 3), 4), 0);- Atomic Operations
A very much similar version of JSFuck, Atomic Operation involved the conversion of straightforward numeric literals or strings into the log in main/second challenge scripts. Also, tortuous expressions benefit from JavaScript’s atomic parts that involve empty arrays, unary expressions, and math operations. Here is an example of this.
// Believe it or not, this is equivalent to:

// a = 1.156310815361637

a =

(!+[] +

!![] +

!![] +

!![] +

!![] +

!![] +

!![] +

!![] +

!![] +

[] +

(!+[] + !![] + !![] + !![]) +

-~~~[] +

(!+-[] + +-!![] + -[]) +

(!+[] + !![] + !![] + !![] + !![] + !![] + !![] + !![]) +

(!+[] + !![] + !![]) +

(!+[] + !![] + !![] + !![] + !![] + !![] + !![] + !![] + !![]) +

(!+[] + !![] + !![] + !![] + !![] + !![] + !![] + !![]) +

-~~~[]) /

+(

!+[] +

!![] +

!![] +

!![] +

!![] +

!![] +

!![] +

!![] +

[] +

-~~~[] +

(!+[] + !![] + !![]) +

(!+[] + !![] + !![] + !![] + !![] + !![] + !![] + !![]) +

(!+[] + !![] + !![] + !![] + !![] + !![]) +

(!+[] + !![] + !![] + !![] + !![] + !![] + !![]) +

(!+[] + !![] + !![] + !![] + !![] + !![]) +

(!+[] + !![] + !![] + !![] + !![] + !![]) +

(!+[] + !![] + !![])

);
Cloudflare bypassing is tough and blames the dynamic and obfuscated nature of its scripts for this. Every time you encounter a Cloudflare waiting room, new script challenges are thrown in front of you. It’s not like you have bypassed the waiting room once and you will enjoy restriction-free access every time.
This is why effective Cloudflare bypassing demands high-end and polished obfuscation expertise. Also, understand that it’s mandatory to construct a fully customized deobfuscator that can easily turn dynamic and modified Cloudflare challenge script into easy-to-understand code every time. One way to reduce the tediousness involved, you can try modifying the abstract syntax tree of the script.
The successful construction of dynamic deobfuscator endows you the ability to grasp what all kinds of checks Cloudflare uses to detect the usage of a bot by a browser or internet user. Once you know this, it would be easy for you to have a solution for the challenge scripts.
Step #4: Investigating the deobfuscated script used
In the first step, we mention the base64 encoded response and we promise to explain it in a later part of the post. Well, this is the time. Let’s understand what they are and what’s their modus operandi.
Cloudflare’s encryption
// Note: aE = new XMLHttpRequest(), an XMLHttpRequest instance initialized earlier in the script

new window.Function(aB.pgNsC(ax, aE.responseText))();
Remember this code? We mentioned it early in the step and consider it to infer that the response body is important to carefully examine the main or second challenge script whose deobfuscated version looks like this.
// Note: aE = new XMLHttpRequest(), an XMLHttpRequest instance initialized earlier in the script

new window.Function(ax(aE.responseText))();
Note that the ab.pgNsC is a proxy cover for ax function and the deobfuscated version of this function is:
ax = function (ay) {

var aF;

var aE = window._cf_chl_opt.cRay + "_" + 0;

aE = aE.replace(/./g, function (_, aH) {

32 ^= aE.charCodeAt(aH);

});

ay = window.atob(ay);

var aD = [];

for (

var aB = -1;

!isNaN((aF = ay.charCodeAt(++aB)));

aD.push(String.fromCharCode(((aF & 255) - 32 - (aB % 65535) + 65535) % 255))

) {}

return aD.join("");

};
This is nothing but a decryption function that Cloudflare uses. With the help of a cipher, Cloudflare applies encryption on the main/second challenge script. When that’s done, the fully encrypted second challenge script is forwarded post successful solving of the initial challenge by POST request.
The real-time challenge execution happens when the challenge is decrypted into a string with the help of the ax function with the help of window._cf_chl_opt.cRay. Here, window._cf_chl_opt.cRay works as a decryption key.
‘ax’ function is then forwarded to the Function constructor so that a new function that can be easily executed with ()! is easily created.
CAPTCHAs
From the below code, it’s easy to deduce the loading of an hCaptcha instance in Cloudflare.
o["_cf_chl_hload"] = function () {

o["_cf_chl_hloaded"] = true;

};

q["push"](function (aD, aC, aA, az, ay) {

aA = false;

o["setTimeout"](aB, 3500);

aC = p["createElement"]("script");

aD = "https://cloudflare.hcaptcha.com/1/api.js?endpoint=https%3A%2F%2Fcloudflare.hcaptcha.com&assethost=https%3A%2F%2Fcf-assets.hcaptcha.com&imghost=https%3A%2F%2Fcf-imgs.hcaptcha.com&";

o["_cf_chl_hlep"] = "2";

aC["src"] = aD + "render=explicit&recaptchacompat=off&onload=_cf_chl_hload";

aC["onerror"] = aB;

p["getElementsByTagName"]("head")[0]["appendChild"](aC);

function aB(aI, aH, aG, aF, aE) {

if (o["_cf_chl_hloaded"]) {

return;

}

if (aA) {

return;

}

/* ... */

}

});
Canvas fingerprinting
Have a look at the below mentioned snippet as it explains how Cloudflare is generating the canvas fingerprinting array functions that can be used later.
S = [

/* ... */

function (a3, a4, a5, af, ae, ad, ac, ab, aa, a9, a8, a7, a6) {

a3.shadowBlur = 1 + O(L);

a3.shadowColor = R[O(R.length)];

a3.beginPath();

ad = a4.width / H;

ae = a4.height / H;

a8 = ad * a5 + O(ad);

a9 = O(ae);

a3.moveTo(a8 | 0, a9 | 0);

af = a4.width / 2 + O(a4.width);

aa = O(a4.height / 2);

ac = a4.width - a8;

ab = a4.height - a9;

a3.quadraticCurveTo(af | 0, aa | 0, ac | 0, ab | 0);

a3.stroke();

return true;

},

/* ... */

];
Timestamp tracking
Cloudflare, at many places, tries to inquire about the timestamps of the browser. Have a look at its real-time representation.
k = new Array();

pt = -1;

/* ... */

if (window.performance.timing && window.performance.timing.navigationStart) {

ns = window.performance.timing.navigationStart;

}

for (var j = 0; j < 10; j++) {

k.push(Date.now() - ns - pt);

}
Event tracking
It helps Cloudflare to find out certain information about devices like mouse clicks, key presses, and mouse movements. For this, Cloudflare integrates EventListeners to every web page.
function x(aE, aD, aC, aA, az, ay) {

aA = false;

aE = function (aF, aG, aH) {

p.addEventListener

? p.addEventListener(aF, aG, aH)

: p.attachEvent("on" + aF, aG);

};

aE("keydown", aB, aD);

aE("pointermove", aB, aD);

aE("pointerover", aB, aD);

aE("touchstart", aB, aD);

aE("mousemove", aB, aD);

aE("click", aB, aD);

function aB() {

/* .. */

}

}
Automated browser detection
Cloudflare takes the help of a few automated checks so that effective detection of browser libraries could take place.
function _0x15ee4f(_0x4daef8) {

return {

/* .. */

wb: !(!_0x4daef8.navigator || !_0x4daef8.navigator.webdriver),

wp: !(!_0x4daef8.callPhantom && !_0x4daef8._phantom),

wn: !!_0x4daef8.__nightmare,

ch: !!_0x4daef8.chrome,

ws: !!(

_0x4daef8.document.__selenium_unwrapped ||

_0x4daef8.document.__webdriver_evaluate ||

_0x4daef8.document.__driver_evaluate

),

wd: !(!_0x4daef8.domAutomation && !_0x4daef8.domAutomationController),

};

}
Sandboxing detection
Have a look at the below-mentioned snippet that explains the script checks that Cloudflare uses when the NodeJS ecosystem is running. The job is done by searching the node-only process object that will look like this.
(function () {

SGPnwmT[SGPnwmT[0]] -= +(

(Object.prototype.toString.call(

typeof globalThis.process !== "undefined" ? globalThis.process : 0

) ===

"[object process]") ===

false

);

/* ... */

});
If Cloudflare tries to figure out the presence of any native functions modifications like monkey patching, it will process toString on the targeted functions.
c = function (g, h) {

return (

h instanceof g.Function &&

g.Function.prototype.toString.call(h).indexOf("[native code]") > 0

);

};
Step #5 – Bringing everything together
Too much to grasp leaving you confused? Well, we won’t blame you the process can make any sane mind go insane. Thanks to the complexities involved. So, here is the crisp overview of all the above-mentioned information.
- Aim of Cloudflare’s anti-bot technology
- Key bot detection techniques that Cloudflare uses in general
- Meaning of Cloudflare waiting room and reverse engineering technique to bypass it
- Steps involved in deobfuscating of Cloudflare challenge scripts
- Techniques that Cloudflare uses to detect bots in the JavaScript challenge process
At the last stage, all you need to do is put all this information together in the said manner and make a move towards Cloudflare bypassing.
Bypassing Cloudflare – The Expert-Recommended Method
First thing first, Cloudflare is an intelligent bot detection method, and bypassing it isn’t going to be an easy job. You need to be extra attentive, informative, and knowledgeable to make sense of the above-mentioned steps.
Also, bypassing Cloudflare’s bot detection technique is only possible or will be successful when you’re aware of both the passing and active bot detection bypassing. You never know which one technique you’ll encounter and knowing only one or two bypassing techniques won’t be enough. Here are some expert-recommended bypassing tips for both bot detection techniques.
Bypassing tips for passive bot detection technique
The passive bot detection process of Cloudflare is far more extensive and needs attention on tons of things. Here are a few tips to make things a bit straightforward:
- Residential proxies are best when you want your scraper to give a legitimate vibe and stay out of the reach of any detector. Out of all the other kinds of proxies, residential proxies tend to remain functional without being get caught. With data center proxies, your traffic will seem suspicious and it won’t be easy to fool Cloudflare.
- Keep switching your IP address. If too many requests are received from one IP address then things will certainly feel suspicious. If that happens, Cloudflare will block you immediately. So, it’s wise to rotate the IP addresses after every session.
- Attach the HTTP header of the original request in the scarper request. By doing so, you’ll be able to give your scraper request an authentic vibe and reduce the odds of being banned. Also, make sure that every scraper header has a valid cookie header.
- Try to match up with a whitelisted fingerprint. It’s important when you decided to go for the browser automation route. This is going to happen only when your scraper is meeting all the default browser requirements. To make this happen, you have to closely analyze the packets of the browser packets that you’re trying to mimic.
- Select your programming language carefully. The language you’re going to use for this job should have substantial low-level access so that it’s easy to control all the customary components for HTTP/2 fingerprinting and Cloudflare’s TLS. If you manage to pull this off, you’ll be able to have a 1:1 match with the browser.
With these tricks, it will be easy for you to bypass the first defense layer of Cloudflare, which is passive bot detection. Mastering this process will make things way better and seamless. As most of the time it’s the passive bot detection that Cloudflare adopts, you won’t be able to bypass the bot detection unless you know how to bypass the passive technique.
Bypassing tips for active bot detection technique
Even though active bot detection is not widely used, it’s not 100% obsolete and is used in various scenarios. So, having an understanding of its bypassing process will help you in the long run. Here is how you can make it happen:
- Learn the Essentials
Gain a deeper understanding of Cloudflare Waiting Room’s key technology or process and refabricate the challenge-solving logic. By doing so, you will be able to deal with the waiting room effectively. The reconstruction process requires an in-depth study of the following deobfuscated script and request flow. It’s important to find out aspects like checks used, orders of checks execution, and checks bypassing processes.
- Learn to Imitate Useful Methods
Learn how to mimic the encryption & decryption techniques that Cloudflare uses for its multiple payloads so that bypassing is possible. It’s a daunting job to do as dynamic challenges scripts are in place. Hence, you need to invest efforts in each request. However, doing so is necessary as it ensures that certain value parsing is in the solver or scraper.
- Have access to Real-time Data all the time
Try to have a hold over real-time device data as it will aid greatly in bypassing fingerprinting. Canvas fingerprinting is too difficult to impersonate and success depends on how good a hold one is over actual device data because of its huge dependency on the dynamic hardware and software components.
Hardware aspects are hard to understand and they are highly advanced and vary extensively from device to device. But, when you’ve access to a wide range of real-time device data, it’s easy to make the scraper effective.
- Do better on the Availability Ground
Always host the device data collector on a highly optimized traffic webpage. This will fix the storage space scarcity and will make more and more device data available. With this data, it’s possible to fool the ML process of Cloudflare.
- Try an Automated Browser
Execute the JavaScript challenge using an automated browser or mimicking a browser in a sandbox ecosystem. By having an abstract of a few challenge-solving logic, bypassing becomes quick as you already have a few inputs.
This approach works but a subsidized performance as browser emulation is a slow and computing-extensive task as compared to a request/algorithm-based approach. So, things will move at a slow pace.
As checks are performed for identifying the sandboxing or automated browsers, you need to learn about processes to bypass those checks.
If you manage to grasp all this with full accuracy, you’re all set to bypass Cloudflare’s bot protection with the help of a viable solver. As the process is too daunting and feels exhaustive mostly, we completely understand if you feel like giving up in the middle. But, you must continue with the scraping project and closely watch over the project accuracy.
Try not to skip any step or create a shortcut for yourself as this won’t make things smooth. Honestly, no shortcut for this exists.
Final words
Cloudflare is a highly viable bot protection that almost all the leading websites and webpages are adopting these days. Its complex bot detection processes ensure that no bot is here to cause a nuisance for the webpage/website owners.
Those who wish to bypass it need to put in more than regular efforts. The post tried to throw light on:
- Cloudflare’s bot detection mechanism
- Cloudflare waiting room bypassing
- Tips to bypass different bot detection techniques
Apply them correctly and you will be able to have a solver that can bypass Cloudflare’s anti-bot facility easily. The great part is, the steps work with any other antibot system with the same ease and perfection if it’s based on principles similar to Cloudflare.
Here you can find the complete list of Cloudflare bypasses throughout history